Author: Karin Brown

Moodle 4.1 has arrived – And it looks good

ETH Moodle has a new look and feel. In this blog we will provide an overview of the most important changes. This post is primarily written for teachers. We encourage you to explore the new interface for yourself. If you need more support, ETH Moodle teachers can register for a workshop in this Moodle course. Contact Moodle Support for more assistance: moodle@let.ethz.ch +41 44 632 06 65 (9:00-​17:00)

Log in as usual with moodle-app2.let.ethz.ch

Landing page: your dashboard

You now land directly on your personal dashboard. The dashboard combines the previous site home page and the previous dashboard. All users will notice the new top navigation menu which contains the elements ‘Course search’, ‘Support’ and ‘News’. At the top of the dashboard you may also find dismissible or time-limited announcements. 

By clicking on your profile picture, you will see a new item called ‘My Media’. This is the new personal media repository system for teachers and students alike. 

The dashboard is fully customisable for all Moodle users. Teachers and students can edit the dashboard (by using the editing button on the top right) in order to move sections (called blocks), add new ones or remove the ones currently on display. The new standard dashboard contains:

  • occasional important announcements.  These will be dismissible or time-limited.
  • a timeline displaying upcoming tasks that are due. Teachers are encouraged to use deadlines for assignments and tasks as these will be featured prominently. Read more about the timeline block
  • recently accessed courses. 
  • an overview of all courses where you are enrolled. You can change the appearance so the courses are displayed as a list or as cards for example. You can ‘star’ courses and select to only see future, in-progress or past courses. Note: This requires teachers to set correct start and end dates in the settings of each course. To add a custom image for your course, upload one via your course settings page. Visit this blog entry for detailed instructions
  • a calendar displayed as a slide block. 
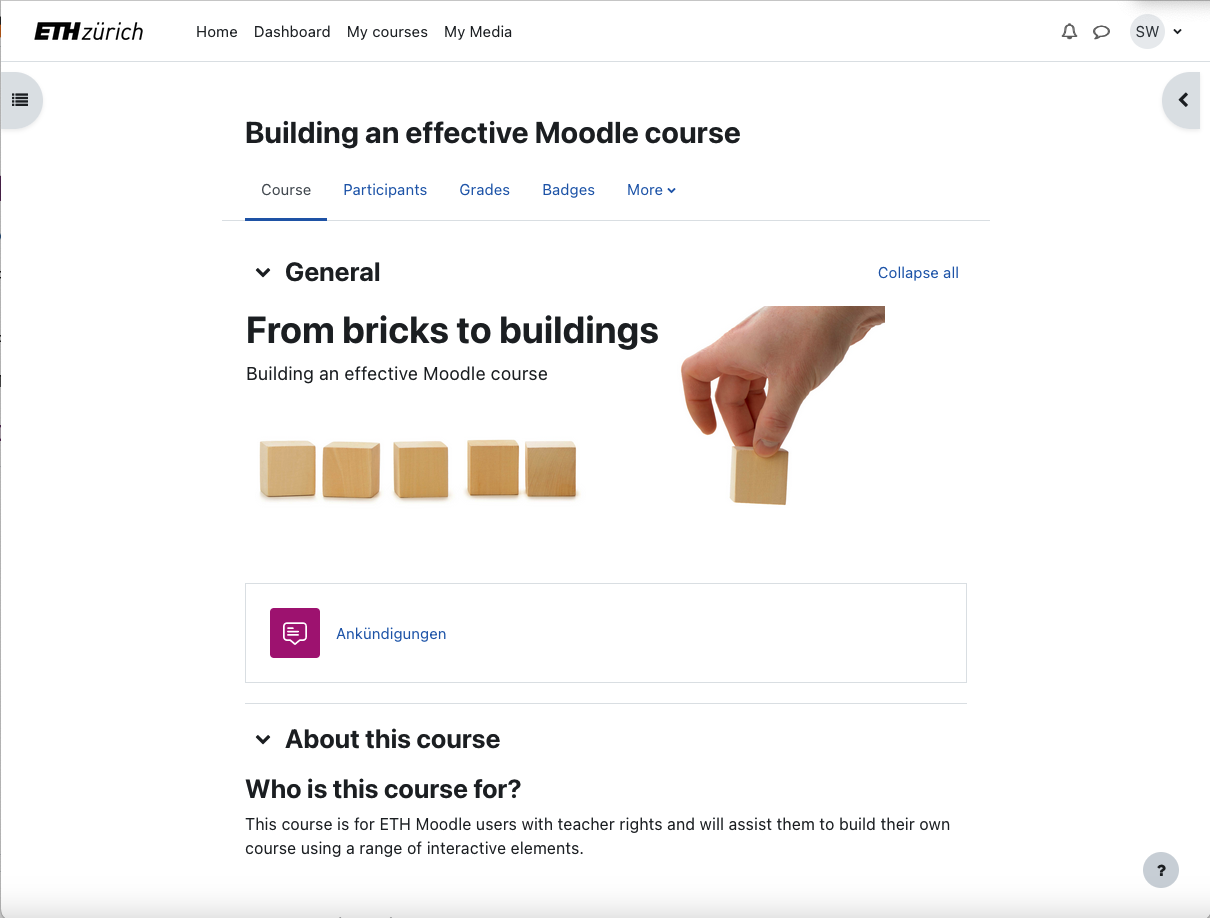
Course view

Once you visit a course you’ll notice the new look with more white space. The existing content of your courses has not have changed, however the appearance may differ slightly.

Screenshot of a Moodle course. There are green arrows and circles highlighting various elements which are mentioned in the text.

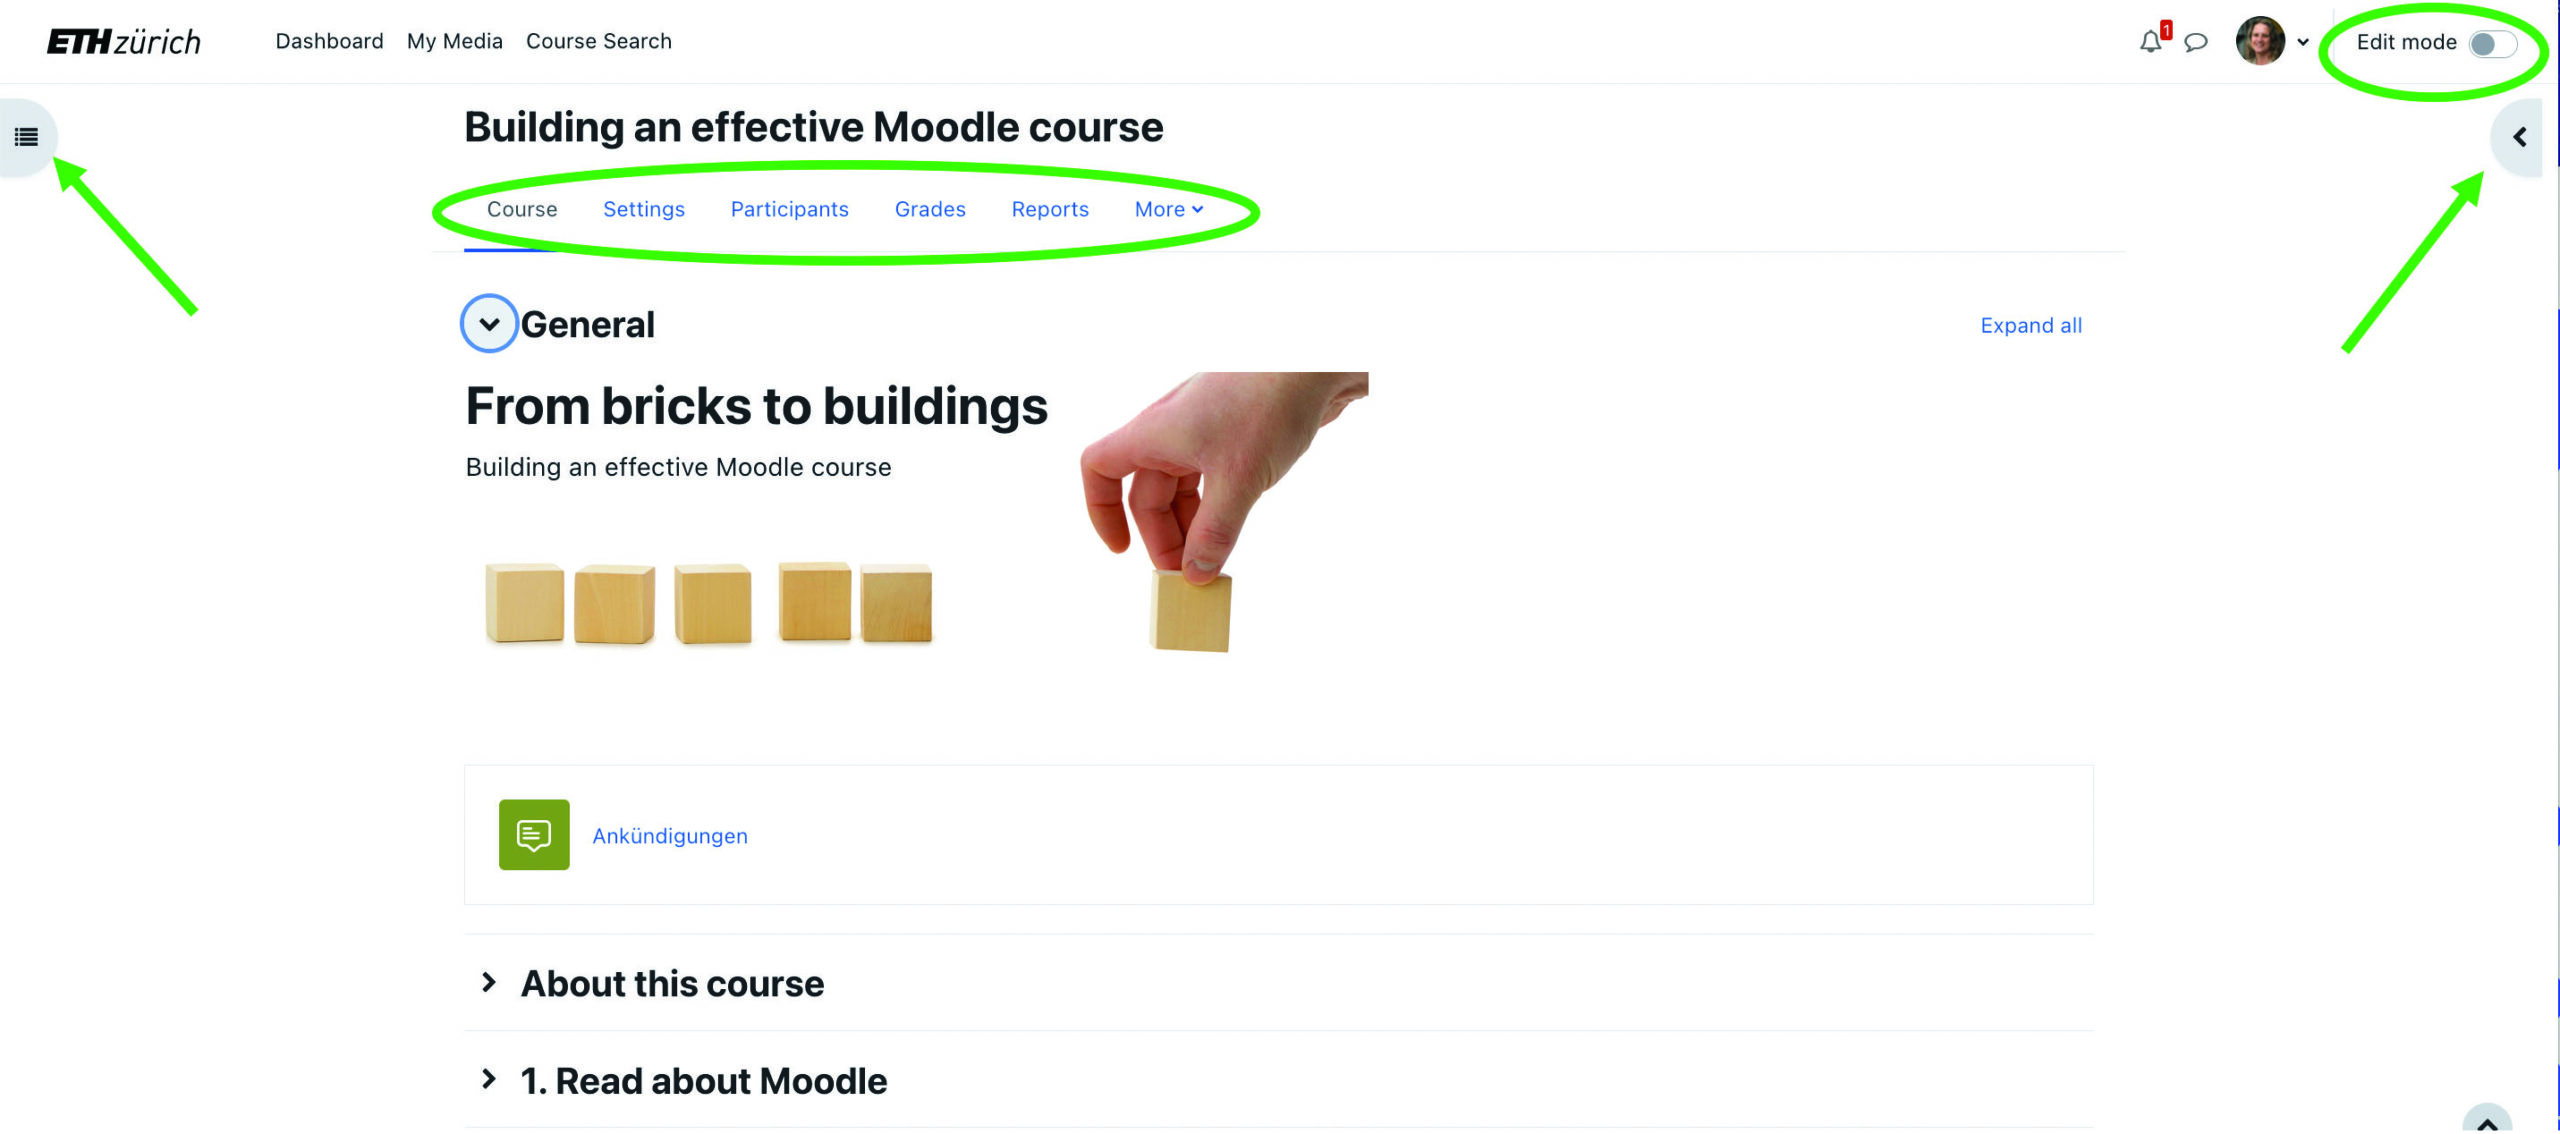
The new edit button is still found top right. You can choose to view the course navigation (on the left) and the blocks in the course (on the right) or you can hide them. 

The new course menu contains fast access to the course settings, participants, grades, reports and more. Under ‘more’ is where you find ‘course reuse’ which allows you to import content. 

Important: we recommend revisiting your choice of course format. The format ‘collapsed topics’ has few benefits as the format ‘topics’ is now also collapsible. In addition, the side navigation makes moving through the course easier and faster. Please be aware that the format ‘Tiles’ does not allow for the side navigation to be displayed. We no longer recommend the use of ‘Grid’ as it does not meet accessibility expectations.
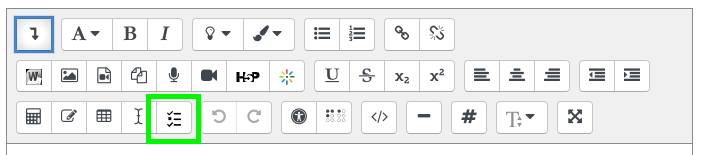
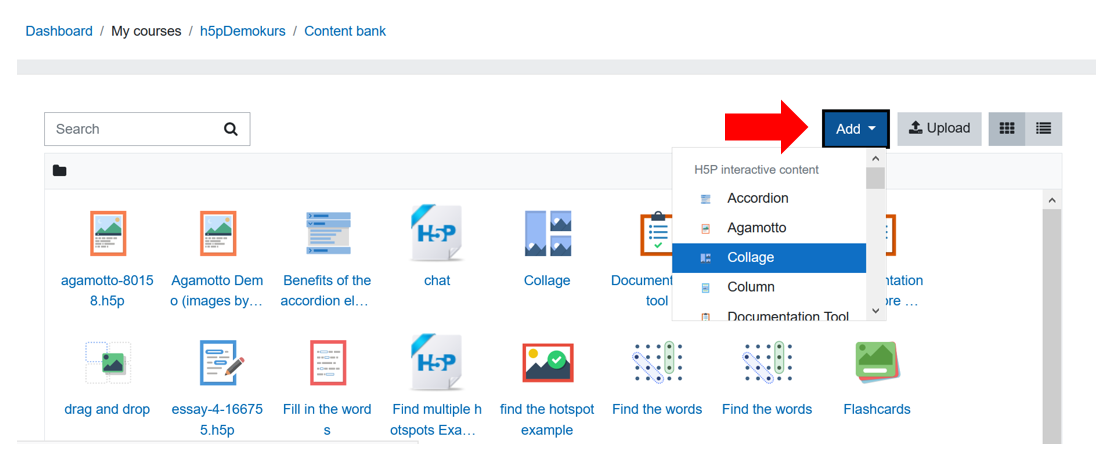
Activity chooser

Screenshot of the activity chooser in Moodle. Six different activities with different colours are shown.

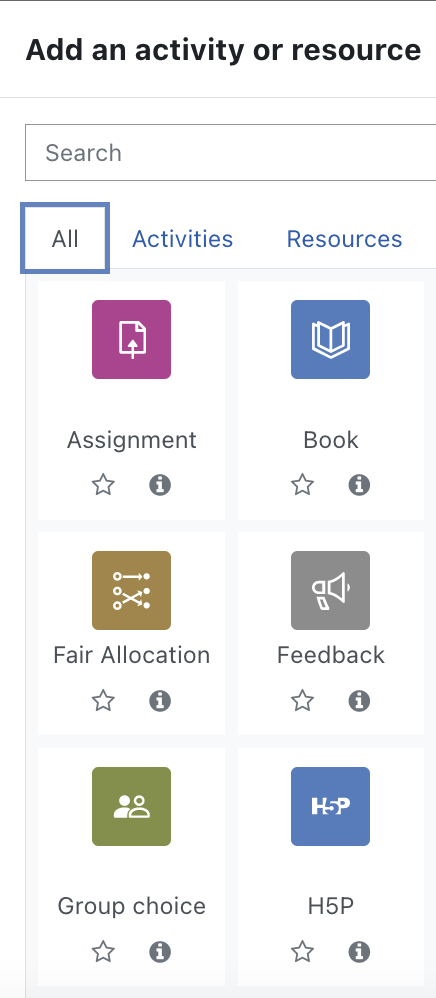
When adding a new activity or resource, you’ll notice the icons for most activities and resources have changed. They have been loosely grouped in to categories and have been allocated a colour to aid with faster recognition. The categories and colours are: 

Assessment: purpur

Content: blue

Collaboration: green

Communication: grey

Administration: bronze

The resource ‘label’ has now been renamed ‘text and media area’ in order to more accurately describe its function. 

The activities and resources are also more like blocks on the page which makes rearranging them via drag-and-drop much easier. Optically, displaying the activity descriptions on the course page is much more pleasing to the eye. Try it yourself. 

Notification on new content

New! When you edit an activity or resources you have the choice to notify course participants. To do so, check the box at the bottom of the activity/resource settings page before saving. This triggers a notification to all course participants.

Screenshot of the settings of a Moodle activity. The checkbox and words "send content change notification" are circled in green.

For more information about detailed changes please visit the Moodle website: 

https://docs.moodle.org/401/en/New_features

https://docs.moodle.org/400/en/New_features

Read more

Posted on , 15 Comments

A new and improved Moodle – Coming to ETH Zurich this summer

In June of 2023, ETH Zurich Moodle will receive a significant update. Moodle has been the central learning management system (LMS) at ETH Zurich since 2010. With more than 10’000 courses it has become crucial to teaching for ETH Zurich lecturers. As an open-source LMS it enables significant customisation. With the new release, Moodle will be more user-friendly, intuitive to navigate and visually appealing, offering a range of improvements for both educators and students. In this blog post, we will explore some of the key benefits of the new Moodle version coming to our screens this summer. A full list of new features is provided on the Moodle website.

Benefits for students

  1. Improved user experience
  2. Improved accessibility
  3. Self-tracking of tasks

Improved user experience.

The LMS has undergone a complete redesign, with a fresh and modern look and feel. Learners can more easily navigate the platform and find the information they need. 

Improved accessibility

Moodle was officially certified as WCAG 2.1 AA compliant in December 2020. The new design includes support for screen readers, improved keyboard navigation, and better contrast, making it easier for learners with visual impairments to access content. The new accessibility features ensure that all learners can access and engage with the learning content, regardless of their ability.

Self-tracking of task

If enabled by course teachers, students will be able to see which tasks still need to be completed in the course navigation index.

Benefits for educators

  1. Improved Course Design
  2. Enhanced Learning Analytics
  3. Significant improvements to handling quiz questions
  4. (Optional) notifications on changes in course
  5. New and improved video handling

Improved course design

The course design as been improved making it easier for educators to create and deliver engaging and effective online courses. The new course format includes an intuitive drag-and-drop interface, allowing educators to build courses quickly and easily.

Enhanced Learning Analytics

Moodle has also improved its learning analytics capabilities, making it easier for educators to track learners’ progress and identify areas where they need additional support. Teachers can build customised reports in order to gain an overview of student progress.  

Significant improvements to handling quiz questions

Teachers will be able to work collaboratively with other teachers to manage different versions of questions and add comments.

(Optional) notifications on changes in the course

Teachers can choose to send a push-notification to let students know when something has been changed on the course page. 

New and improved video handling. 

Kaltura will replace OpenCast as video management tool for Moodle. All previously uploaded videos will be automatically migrated to Kaltura. Teachers will be able to upload and manage their course videos directly over the text editor.

Timeline

A link to the preview version has been sent to all current teachers of the ETH Zurich Moodle system. It includes all content from the live system as of 3 April 2023. This is a valuable opportunity to see what existing courses look like in the new version, explore the new look and to identify important changes that may be necessary once the live system is active.

There will be no notifications on this preview system, so educators can experiment without triggering notifications for students. It will be valid until 6 June 2023 at which point the entire preview system will be deleted. This system may not be used for any actual teaching or learning activities as there may be unannounced updates and downtime.

If you already want to start preparing your HS 2023 course before 7 June, you have 2 options:

  1. Create your course via eDoz and start working on the course on the current live 3.11 course Moodle system. Any content you prepare on the current course Moodle system before 7 June will automatically be upgraded to the new Moodle version and its new design.
  2. If you already want to prepare content in the new Moodle 4.1 version, please use one of your already existing pre HS2023 courses on the preview server, create a mzb-backup (“course backup”) before 6 June. After 7 June, create a course via eDoz on the (updated) live course Moodle and then import the backup file into your live course.

On 7 June 2023 the live system will be updated to the new Moodle version. Detailed information regarding the changes will be available at this point. Educators can then set up their HS23 courses via eDoz and make necessary adjustments to their courses prior to the semester start on 18 September 2023.

Read more

Posted on ,

Retrieval practice – Newest option in Moodle

Testing students’ recall of recent learning is often done by creating Moodle quizzes with a range of different complex questions. Now teachers can embed previously created questions in any HTML text area without packaging them in a quiz. This includes on the main course page, inside a Moodle book, even in a block on the side.* 

Why it’s a good idea

The pedagogical principle behind this function is called “retrieval practice”. The essence of this idea is that the more you practice recalling specific memories, the stronger the memory becomes. The very act of bringing information to mind strengthens the students’ ability to do so. However, test anxiety can really get in the way of fluid and competent performance. Therefore it is a good idea to provide frequent opportunities where students can quiz themselves without worrying that their performance will impact on their grade. Viewed this way, quizzing can be understood as a learning strategy, not an assessment strategy. Best practices include having frequent opportunities, spacing them out and using different kinds of questions. (Read more about retrieval practice at www.retrievalpractice.org.)

How to do it

First, your Moodle course must already contain the questions you want to embed. You may want to create a category just for this purpose. If you haven’t already, make sure both your category and your questions have an ID number. This is essential. Also wherever possible, make sure your questions provide students with useful and specific feedback for both correct and incorrect answer options. 

Then, decide where to embed the questions. You can select any area where you can enter HTML text. Turn editing on. Use the “Show more buttons” button to expand the toolbar (shown in blue). Select the “Embed questions” button (shown in green). Select the category and then the question you would like to embed.

Moodle editor. The "show more buttons" and "embed questions" buttons are highlighted.

Finally, save and admire your work! Always remember to test your work and check it in the mobile view before you release the course to students. 

Additionally, you can see an overview of how students have progressed in the reports section of the course. Via the gearwheel, go to “more” and in the “reports” section you can see wether students have answered the questions and where they may have struggled. 

Contact LET support via phone (044 632-0665) or email if you need additional support.

*Not available in Polybook.

Read more

Posted on , 4 Comments

Teaching “Dynamic earth” using flipped learning

We spoke with the project team that converted the lecture “Dynamische Erde I” to a flipped learning context. Dr. Oliver Bachmann and Léon Frey shared their experiences.

Drone captures volcano activity

The aim of this project was to produce a series of videos which replaced a portion of the lecture “Dynamische Erde I” at the Department of Earth Sciences. Part of the lecture will still be held on campus. The videos will be watched by the students individually as a preparation for the lectures held in class. The videos cover a considerable part of the content in an easy-to-understand way. This is a “flipped learning” teaching approach which plans the necessary knowledge acquisition as an individual activity for students to complete (in this case watching videos) in their own time. The face-to-face time is then used to further engage in deeper discussion.

What triggered this experiment?

During the corona pandemic, when lectures were held online, it became evident that high-quality online material, in particular podcasts, would greatly enrich a lecture. Online lectures via Zoom do work but they should be augmented by other teaching methods. For this reason, this project was launched.


Which specific actions were taken?

We first thought about the content for the videos. Which elements should be part of the videos and what should be kept in class at ETH? We made this decision by identifying pure information that we wanted to convey in contrast to sections of the course that required interaction, activity and discussion. After that, we wrote scripts for the videos and created the necessary illustrations. We filmed both at ETH and on different locations the field using both a camera and a drone. The last step was editing the videos and making them available for the students.

Léon Frey explains ions.

What were the results or outcomes of the project?

The result of this project is flipped learning scenario which includes a series of videos on mineralogy, magmatic processes, metamorphic processes and the rock cycles. The videos are available here (videos are in German): https://www.youtube.com/channel/UC-Zw-otyiP39U2zvzgCq0cQ/

Can you describe the impact on students?

Students will be able to watch the videos starting in the fall semester 2022, which lies in the near future at the time of writing. Therefore, we don’t know the impact yet. However, we did some test videos last autumn. In a survey, students rated these videos very positively. We look forward to seeing what the student feedback is after the autumn semester 2022!

What lessons did you learn? What would you do differently next time?

Video production takes a lot of time. More than you might think at first. And there is always the temptation to do more and to do it better – to do another take, trying to do better than in the last take. Therefore, it is important to know when it’s enough – or when time does not allow for more attempts. Next time we would proceed the same way – in the end everything worked out well and as planned.

What first steps do you advise for others who are interested in doing the same?

Don’t underestimate the time video production needs. Our team came into this project with existing experience and skill in creating such videos and also invested a fair amount of time in learning how to do it well. And don’t underestimate the skill required to stand in front of the camera and speak confidently. If you have no experience in neither of those, plan for enough time to practise and get used to it.

Screenshot from the introduction Video for Dynamische Erde I

This project was funded by Innovedum, the Rector’s fund for advancing innovative education at ETH Zürich. You can keep up with development of this project in the public Innovedum database. If you are interested in applying for a project yourself, you can find information and the login to the application process here: www.innovedum.ethz.ch.

Read more

Posted on ,

Moodle forums – Now with anonymous posting

Next to the course catalogue, Moodle is the most used system at ETH Zurich when it comes to supporting active online teaching and learning. However a common complaint from both students and teachers was the lack of anonymity when it comes to forum discussions. As of September 2022, this has changed.

The Moodle update in September brought in a new plug-in called «Moodle Overflow» (inspired by Stack Overflow) which enables additional functionality not available in the regular Moodle forum. The Overflow forum is particularly suitable for courses which have a high number of forums and a high amount of activity in the forums due to the improved overview. The regular Moodle forum provides a different set of settings.

Overflow advantages

  • Better overview. When entering an Overflow forum, both teachers and students can see which threads are new (unread) and which have not yet had an answer marked as «correct» and «helpful». The overview also shows votes and the number of replies.
  • Anonymity. Overflow enables teachers to choose between two types of anonymity, questioners only or questioners and answerers. These settings are irreversable.
  • Rating. All course participants can «rate» a thread in the Overflow forums. Highly rated posts move towards the top. Teachers can use this feature to ask students to “vote” for best answers. This is a fast way to strengthen the visibility of a particular response and means students don’t have to post answers in order agree with an existing answer, they can just upvote.
  • Reputation. If teachers enable it, Overflow can track the reputation of participants either in a single overflow forum or across all Overflow forums in the course. Answers by students or Teaching Assistants with higher reputations will be more credible.
  • Mark as correct/helpful. Answers can be marked das «correct» by teachers or as «helpful» by the questioner. It does not have to be the same answer. This means that a teacher can overrule any discussions by labelling a specific answer as the correct answer and prevents students from accepting incorrect answers.
  • Moderation. Posts by students will only be published once a teacher has approved it.

Is it perfect? No. One complaint is that the question is no longer displayed when participants begin writing their own comment or answer. In addition only answers (not answers to answers) can be marked as helpful or correct.

Things to consider when creating an Overflow Forum:

  • Should students be automatically subscribed to this overflow?
  • Which answer should be displayed first, helpful or solved?
  • Should the reputation (rating) be aggregated over several MoodleOverflows?
  • Should negative ratings be allowed?

If you need further information, we recommend this help (in German only): https://www.uni-leipzig.de/fileadmin/ul/Dokumente/2020_Lehre-digital_Moodle_Overflow.pdf

Moodle Forum advantages

The default Moodle forum has many additional features, even experienced Moodle users might find something new in this list. 

  1. Different types: There are four types of forums to choose from. The standard forum is the one most people are familiar with. The single discussion only allows one discussion to be posted by the lecturer and students can only post replies. The Q&A forum requires students to post an answer before they can see the replies of others. The final type is much like the standard forum but it displays the content more like a blog. 
  2. Time settings: Teachers can post in advance and delay the publication of their entry. They can also choose to have their post only visible for a particular time frame or create a due date by when students have to have responded. 
  3. RSS: An alternative to subscribing, when enabled this feature means new forum discussions (or posts) will be sent via RSS feed.  
  4. Locking Discussion: Teachers can lock the discussion at any point preventing further posts by students. 
  5. Post threshold: In order to restrict individuals from flooding a forum, teachers can set a maximum post threshold which automatically blocks users once they reach it. Teachers can also choose to have the word count displayed (but not set a limit). 
  6. Better completion setting options: The Moodle forum has more completion setting options in cases where lecturers want to track completion. 
  7. App compatible: The Moodle forum is fully compatible with the ETH Moodle App. The Overflow forum will redirect you to a browser. 

For more information about the Moodle forum please visit: https://docs.moodle.org/311/en/Forum_activity 

How about you?

Which forum are you planning on using? Please share your scenarios in the comments so we can collect examples in action. If you are interested in chatting with other lecturers at ETH Zurich who are using Overflow you are welcome to join the (ETH only) Moodle course https://moodle-app2.let.ethz.ch/course/view.php?id=15312 . 

Read more

Posted on ,

Meeting the diverse needs of Student Teaching Assistants

Serena Pedrocchi (Faculty Developer at the Unit for Educational Development and Technology) describes how courses at ETH Zurich designed for Student Teaching Assistants will continue to grow to meet the needs of an increasingly large and diverse group.

Course overview of online course “Didactic Basics for Student Teaching Assistant”

The teaching assignments of Student Teaching Assistants (“Hilfsassistierende” as Student TAs) are of great importance in the daily teaching routine at ETH Zurich. Student TAs are distinguished from each other not only by their knowledge of the subjects they teach, but also by the different roles they can take on in teaching: From being the contact person for correcting exercises to the role of exercise leader, or tutor and group coach. Different forms of teaching also require different competences, which is why it is a priority for us in the Faculty Development Team to cover these different specialisations in our didactic courses as well. By offering three very different courses Student TAs with different roles can select a course that best prepares them for their role.

Didactic Basics for Student TAs
In this course, Student TAs learn to plan their workshops and exercises effectively, practice activating methods and are also guided to transfer these into their real lessons. The focus is on imparting knowledge of learning psychology and didactics as well as on topics to develop the skills and self-confidence to effectively plan and teach one’s own workshops and classes. In the microteaching workshop, in which participants practice their teaching skills with one another and receive direct feedback (peer learning), participants build confidence in what works for them. In addition, the course aims to support Student TAs to think critically and reflectively about their students’ learning and to develop engaging learning activities. The course encourages Student TAs to network with peers from different disciplines, which can support them in developing their teaching skills by building a long-term network.

Banner in “Coaching Students” online course

Coaching Students
This course enables Student TAs in their role as student coaches to develop basic knowledge in coaching techniques and guiding of learning processes. The participants acquire coaching skills and methods to effectively guide and accompany individual students and especially teams of students in working and learning processes. This includes knowledge about team development phases, cooperative forms of learning, facilitation of decision-making within a team, reflection on critical phases and solving conflict situations in a team. This course also enables Student TAs to network with peers from different disciplines.

Ready, Set, Go!
This course has been developed for online self-study and has no transfer phase. Participants can work through the course at their own pace and complete it individually. The aim of this course is to offer the Student TAs a first low-threshold opportunity to familiarise themselves with didactic basics and thus to gain an overview of essential teaching concepts. In the online course, two “personas” (invented tutors with realistic characteristics and depicted in realistic situations) demonstrate concrete examples of teaching. First, the course participants are shown theory about teaching and learning, which is then applied to a fictional situation through the personas in a second step. After seeing the theory in “action”, the participants are shown how to transfer the concepts into their own teaching context.

We expect a strong increase in the number of participants in the didactic courses for Student TAs. The blended learning format (with emphasis on online-learning) will continue to ensure that the course is able to meet the increased numbers. Furthermore, increasingly Student TAs are confronted with new, more complex didactic concepts in their teaching (such as blended learning, flipped classroom, to name a few), which is why it is necessary for us to continuously develop the courses in order to prepare Student TAs adequately for their teaching tasks. Hence, an extension of the specialisation modules in the courses is planned.

If you are interested in finding out more, please visit the professional development page of our website.

Read more

Posted on ,

Your mission: Build an intelligent boat

In a project-based course, students learned to apply materials knowledge and skills to the construction of a boat that could navigate an unknown terrain using artificial intelligence. We talked with the two lecturers Rafael Libanori and Henning Galinski, and the department’s Educational Developer Lorenzo De Pietro to find out more about this innovative course in the Department of Material Sciences.

Lukas Wooley and Sebastian Gassenmeier get their boat ready.

What triggered this experiment? 

Originally, we were inspired by AP50, a project and team-based introductory physics course taught at Harvard. We wanted to do more with problem-based learning at ETH Zurich and achieve a different kind of learning environment. Students tend to expect that lectures just “give the knowledge”, but there is so much more to teaching. We realised it’s important to teach students how to learn more efficiently and take more responsibility for their own learning. In this course, we give students scientific questions to answer themselves. We wanted them to start taking risks and to have the freedom to fail, which is what science is all about. It’s not just theoretical input. Interpersonal and technical skills are just as important as academic skills.

A hand is shown holding a small home-made boat. There are lots of electronic elements visible.

What exactly did you do? We applied for Innovedum funding and when we were successful recipients we created a course that gives the students a project that has a connection to material sciences, as well as other areas such as controlling and artificial intelligence. We receive support from Antonio Loquercio in the controlling and computer vision part. He is currently a Post-Doc at the University of Berkley, California. Without him, it would have been very difficult to achieve the computational goals of the project. Students attended 4 weeks of theoretical classes and then started working in teams. The goal is to construct a model boat which can intelligently navigate a course using the Materials Design Lab at D-MATL. We also employed PhD students as coaches to support the students. 

What were the results?  We had 16 students who completed the course in the spring of 2021. The challenges were big and so we were thrilled by the final outcomes. The students took it seriously and at the end of the course there were four final boats. The students displayed great creativity, such as building small experimental set-ups along the way. They were able to solve problems on their own, in groups and learn from each other. 

What is the student perspective? Students were frustrated initially because we took a passive approach to communicating knowledge, but they saw the benefit of this approach at the end. We believe that learning should strain their abilities and that it is iterative. But it is wonderful that it ended on a celebratory note with the functional boats that successfully navigated the terrain. 

What lessons did you learn? We realised that in the future we need to spend more time explaining our approach to teaching and clarifying expectations right from the start. We also plan to pay close attention to the gender-balance among our students as we want to maintain a good mix as the course grows.

What are your plans for the future regarding this project? Due to the current curriculum revision projects in our department, there will likely be an increase in hands-on courses like this one. So, this course represents a new way of teaching, like a prototype for the new curriculum. The results will be looked at closely and are quite important for future decision-making in the department. Teaching this way is also a development opportunity for the lecturers. 

What first steps do you advise for others who are interested in doing the same? We think it is important that teaching is viewed as a design science, in other words that it benefits from careful planning and time. We recommend visiting other courses that already use this kind of approach and speaking with the course leaders to gain inspiration and practical ideas for implementing project and problem-based learning in your own course. We would be happy to share our experiences with others.

Read more

Posted on ,

Tips for Moodle courses

Sometimes it doesn’t take much to make your Moodle course both more effective and visually appealing. The following tips are a quick and fun way to introduce ideas for improving your Moodle course using principles of good website design. Lecturers at ETH Zürich can learn more using Moodle in the self-paced online course “Building an effective Moodle course”. Read more about the course.

What are your essential tips for making Moodle course more visually appealing and effective for learning? We would love to read your comments on this topic.

Be welcoming. Introduce yourself. Use friendly, gender-neutral and approachable language.
Add visual elements. Insert banners to create a course identity. Icons and pictures make your course page easier to digest. Add course images in the settings for easy dashboard navigation.
Choose the right course format. "Topics format" ist he default and creates a list of content. "Collapsed topics" voids endless scrolling. "Tiles" provides a great visual overview.
Establish hierarchy and consistency. Use different heading sizes to signal hierarchy. Align things vertically to imply similar properties. Use consistent layout to create familiarity fast.
Provide assistance. Add a forum for asking questions of peers or teaching staff. Be responsive and friendly when students ask questions. Make sure your contact details are available.
Create an overview. Use visuals to provide an overview of your course structure. Create an advance organiser that shows your course content. This helps build up a mental framework for organising information.
Make it accessible. Add image descriptions for screenreader. Add closed captions in videos. Use descriptive link text like "chapter three" and not "read more".
Manage text volume. Display a paragraph or less on the main course page. Place multiple paragraphs in an HTML page. Put multiple pages in a Moodle book or Polybook.
Check quality across platforms. Always check your course appearance in the App. Blocks disappear in the mobile view. Course formats are simplified.

Read more

Posted on , 3 Comments

Moodle is more interactive than ever with H5P

Task: Mark the security measures for this aircraft

H5P is a special toolset that enables teachers to enrich their Moodle courses. Teachers can firstly add interactive elements in Moodle content and secondly adjust the visual appearance of Moodle course pages. Both can enhance the learning process.

Research shows that digital learning is most effective when students interact with content, answer questions and most importantly, get immediate feedback. The critically important feedback loop that is naturally present in face-to-face learning is often missing in digital learning environments. Students want to find out immediately if their answer was correct or not. By providing performance feedback during digital learning, teachers can provide learners with a sense of the real-world consequences of decisions students make. Therefor the vast array of available interactive elements is especially important, since it offers options for almost every learning situation.

Effective digital learning should also provide learners with realistic practice opportunities; for example, simulations, scenario-based decision making, case-based evaluations, and authentic exercises.

Use H5P’s interactive elements to support reflection, application, rehearsal, elaboration, contextualisation, debate, evaluation, synthesisation, and so on. Focus on using H5P to add interaction and attractive graphic elements. H5P is not recommended for graded activities as tech savvy students can download and analyse the resulting XML file.

Example elements to increase interactivity

Select interactive elements, such as “Agamotto” which compares images as shown below.

“Find multiple hotspots” invites students to point out important aspects in images. Example: Find all the vegetables in this picture.

Or you can add a structural element to your course by adding the element “Accordion” which enables you to create collapsable paragraphs.

How to add H5P to your Moodle course

This must happen in two distinct steps. First you must create the content and save it. Secondly you embed the new content to your course.

To create the H5P content, access the “Content bank”. There is a shortcut in the navigation to the left of your screen.

Click on the “add” button and select the type of element you would like to create.

To help you decide which H5P element is best for your needs, we have created several exemplars to help you choose. You can view these exemplars in the “Building an effective Moodle course” in the section “Using special features“. (No enrollment key necessary).

In addition you can visit the H5P website to see more detailed examples, instructions and tutorials. Important note: There are more elements listed on the H5P website than are available on the ETH Moodle system. 

After you have created H5P element, make sure you save it with a clear name so you can recognise it later. 

Now you have two options for using the H5P element.

The first option is to add it as a separate activity. Simply add a new activity and select H5P. Then choose your pre-made element. This scenario make sense when you want to focus on the element as a stand alone activity and don’t want to embed it within additional text.

The second option is to add H5P as part of a text. Navigate to the exact spot where you would like to add the element (for example in a Moodle book or in a label on the course page) and begin editing.

In the editing toolbar, first expand the view of editing tools.

Then select H5P.

This will prompt you to “browse repositories”. The H5P content bank is shown as one of the repositories. All the elements you have already created are shown here. Select the one you need. 

We recommend selecting the option “Create an alias/shortcut to the file”. This ensures that when you make a change to the original element in the content bank, it is automatically updated on your course page or wherever it has been embedded. 

Preview how it looks by assuming the student role. (Switch roles by clicking on your profile picture.) We also recommend checking out it appears in the Moodle app. To make any changes to the element, you will need to go back to the content bank using your computer (not your mobile device), edit and save. It will update automatically if you have embedded it as an alias.  

Enjoy!

More information in the “Building an effective Moodle course” in the section “Using special features“. (No enrollment key necessary).

Read more

Posted on , 3 Comments

Being more human online together

Many useful lists provide technical recommendations for optimising virtual meetings (here is one from the IT Services Team at ETH Zurich. In this short post, though, I will go one step further. In video conferencing we are, quite literally, “hosts”. This makes us responsible for managing the behaviour of others, especially if it is disruptive. In this context it is important to communicate our expectations clearly. This requires us to consider our own requirements and the needs and circumstances of those participating in our virtual sessions, and to find a balance between them.

Teaching involves relationships, firstly between lecturers and students, but also among students themselves. Therefore, effective facilitation addresses the needs inherent in human relationships and how we can respect these in the virtual environment.

Let’s look at some key aspects to be considered:

Eye contact

Eye contact conveys attention and interest. (Keep in mind here that some cultures prefer to avoid direct eye contact.) If you wish to transmit a sense of eye contact, you can do this by looking directly into the camera and not at the face of the person you are talking to, even if this means that you yourself lose eye-contact. One tip is to minimize the facial images and move them to the top of your screen, near your camera. Your gaze is then close to the camera, but focused on faces.

Names

Many video conferencing tools allow participants to change the name displayed alongside their image. Consider asking students to adjust this to their preferred name. “SmiJo” is a lot less personal than “John Smith” or even just “Johnny”.

Rapport

To build rapport, take the time to make people feel acknowledged and welcome at the beginning of a virtual session. Create space for “warming up” with smalltalk before launching into the reason for the session. Depending on the size of the group you may wish to greet individuals by name when they appear, even if they are late. If the group is large, you can still acknowledge latecomers en masse. Trusting that their reasons for being late are legitimate will help to create an atmosphere which is conducive to learning.

Sound

Think about how you want participants to manage sound. Is it important to minimise background noise? The more participants there are, the more distracting background noise can be. However, in smaller informal settings, ambient noise can help people feel connected – an important consideration the longer we are in physical isolation. Agree on how the mute button should be used.

Video

A common belief is that all participants should switch on their cameras when joining a Zoom meeting. However, this may be difficult for various reasons: attendees may not have a camera; there may be other people around; or their bandwidths may not be able to cope with video. Some people are also profoundly uncomfortable with displaying themselves on camera for long periods.

Lecturers should therefore consider why they want students to turn their cameras on. Then they should articulate their expectations, and consider equally acceptable alternatives. Do cameras really need to be switched on? If so, is that for the whole meeting? For example, if the meeting is long, but not particularly interactive, the lecturer might ask the students to turn their cameras on at the beginning to “establish contact”, but say that it’s OK to switch them off later. This might be especially relevant if everyone is viewing slides, for example. Using “hide self view” can also minimise the cognitive fatigue we are all experiencing due to the increased frequency of online meetings and length of time spend in video conferences.

Remember that not everyone thinks about how they appear on screen: it may be useful to give people feedback and guidance in this area. Their lighting may make their images too dark to see, or if the video is flickering it can be hard on the eye after a time.

Background

The background displayed on the screen can be both informative and distracting. Students may choose virtual backgrounds to obscure a messy room or one that reveals things they prefer to keep private (such as family photos or an extensive wine collection). If their choice of background is too distracting you should let them know. Conversely, you can use the virtual background function as a way to connect. Ask people to share a photo of a place meaningful to them, or an image that provides comic relief!

Movement

As the host, when you view a gallery of many faces your eye will naturally be drawn to movement. If people join via mobile phone or tablet, they are likely to be more mobile and may move around in their spaces. This is sometimes unavoidable, but it can be very distracting. Make participants aware of this and ask them to deactivate their screens if they change positions or if they are moving around a lot.

Chat

Think about the best way to use the chat function. Will you be monitoring it actively, or not at all? Would you like people to use the chat to announce their departure from the session? Most video conferencing tools offer multiple ways to communicate. Tell your students how you want them to use them.

The intention of this post was to encourage you to think broadly about how you run a virtual meeting or lecture as well as how you manage your own on-screen behaviour. Our available technology provides us with so many options, but these sometimes generate divergent behaviour. Here establishing fair expectations will go a long way towards facilitating a successful virtual event.

Read more

Posted on , 3 Comments